|
|
|
||
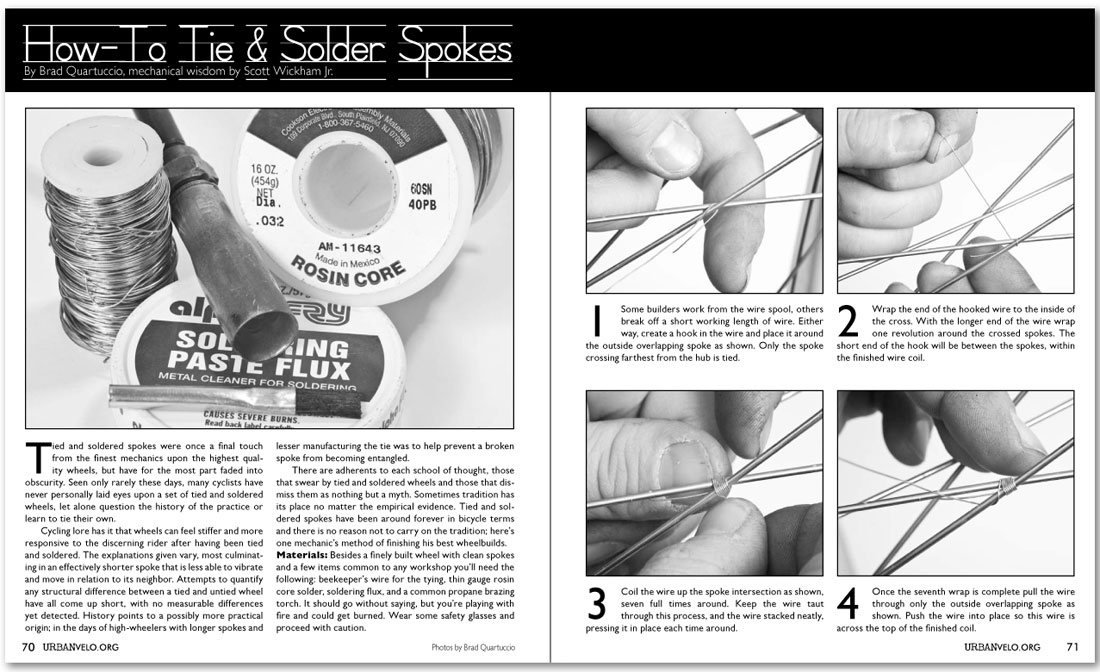
How-To Tie & Solder SpokesBy Brad Quartuccio, mechanical wisdom by Scott Wickham Jr. Tied and soldered spokes were once a final touch from the finest mechanics upon the highest quality wheels, but have for the most part faded into obscurity. Seen only rarely these days, many cyclists have never personally laid eyes upon a set of tied and soldered wheels, let alone question the history of the practice or learn to tie their own. Cycling lore has it that wheels can feel stiffer and more responsive to the discerning rider after having been tied and soldered. The explanations given vary, most culminating in an effectively shorter spoke that is less able to vibrate and move in relation to its neighbor. Attempts to quantify any structural difference between a tied and untied wheel have all come up short, with no measurable differences yet detected. History points to a possibly more practical origin; in the days of high-wheelers with longer spokes and lesser manufacturing the tie was to help prevent a broken spoke from becoming entangled. There are adherents to each school of thought, those that swear by tied and soldered wheels and those that dismiss them as nothing but a myth. Sometimes tradition has its place no matter the empirical evidence. Tied and soldered spokes have been around forever in bicycle terms and there is no reason not to carry on the tradition; here’s one mechanic’s method of finishing his best wheelbuilds. Materials: Besides a finely built wheel with clean spokes and a few items common to any workshop you’ll need the following: beekeeper’s wire for the tying, thin gauge rosin core solder, soldering flux, and a common propane brazing torch. It should go without saying, but you’re playing with fire and could get burned. Wear some safety glasses and proceed with caution. 1 Some builders work from the wire spool, others break off a short working length of wire. Either way, create a hook in the wire and place it around the outside overlapping spoke as shown. Only the spoke crossing farthest from the hub is tied. 2 Wrap the end of the hooked wire to the inside of the cross. With the longer end of the wire wrap one revolution around the crossed spokes. The short end of the hook will be between the spokes, within the finished wire coil. 3 Coil the wire up the spoke intersection as shown, seven full times around. Keep the wire taut through this process, and the wire stacked neatly, pressing it in place each time around. 4 Once the seventh wrap is complete pull the wire through only the outside overlapping spoke as shown. Push the wire into place so this wire is across the top of the finished coil. |
|
|